Pneumatic systems
In this document we provide a tutorial on how to connect and control a pneumatic system with the robot. The pneumatic systems are usually used for suction grippers (suction cups), soft grippers and pneumatic grippers.
Air tube and fittings
Throughout this document we use 6mm (OD) and 6mm push-to-connect tube fittings, for passing the air and connecting the pneumatic devices. All our suggestions are based on this dimension. Depending on your application you can use different sizes.
Air compressor
To run and operate a pneumatic kit, you need to have access to a compressed air. Most generic air compressor in the market can work with our pneumatic kits, and all you need to do is to connect the air compressor to the intake port of the 5/2-Way pneumatic valve ( port B on the solenoid) via an air tube.
Something you want to keep in mind when searching for an air compressor is:
- The noise level
- Air tank volume
- Portability
For example, this item can be a good general candidate for the air compressor.
Air pressure
The suction force of a suction cup, or the jaw force in your pneumatic gripper are all proportional to the air pressure generated by the air compressor. We usually set the air compressor to 500 kPa.
Depending on your application you can always increase or decrease the air pressure. Read your tool head and air compressor datasheet to find the right and safe value.
Connect the air compressor
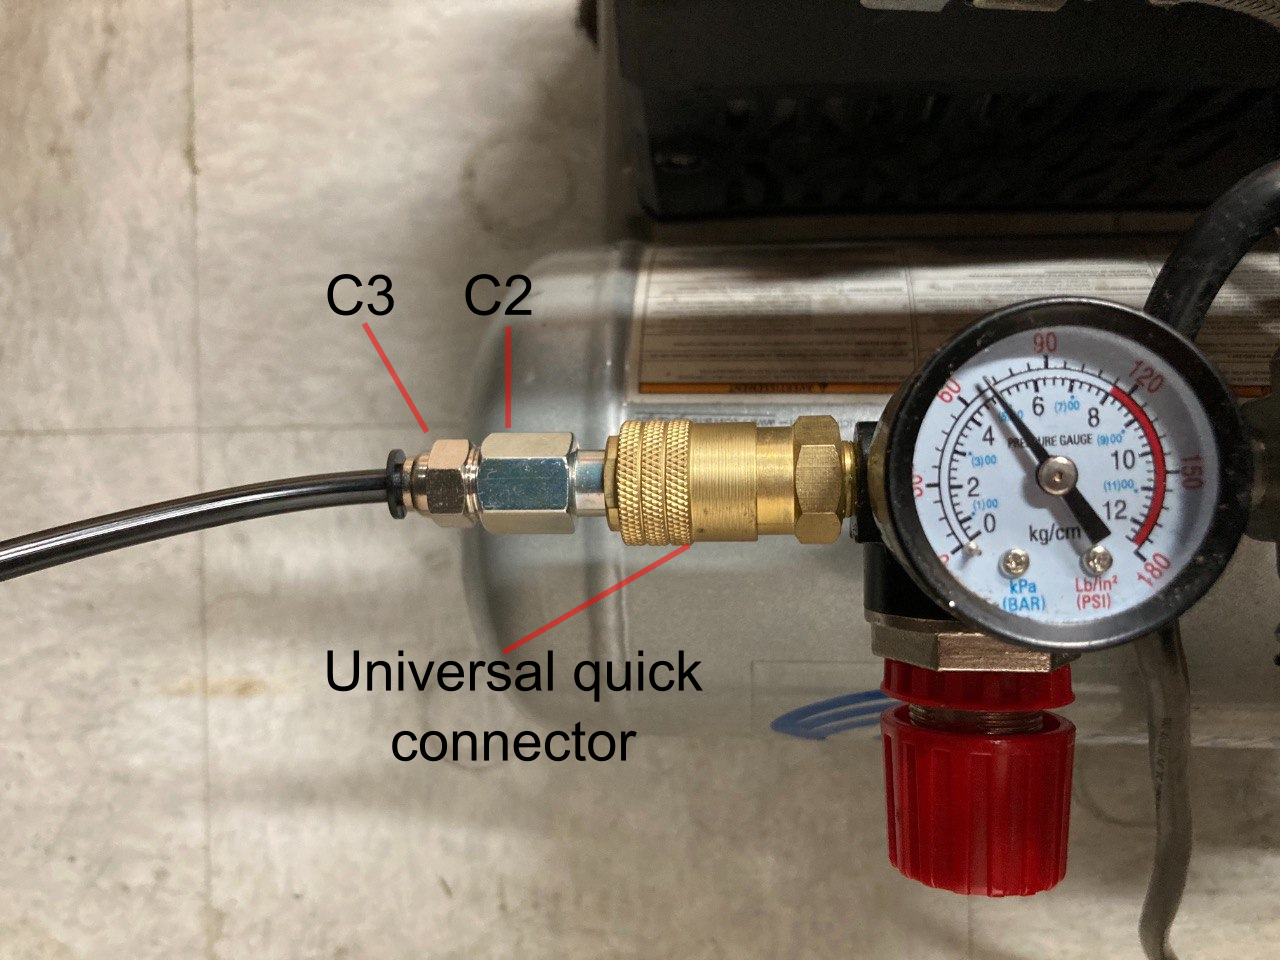
You usually need the right coupler(s) to connect the 6mm air tube to the air compressor. Most air compressors have universal quick connector, to get connected to your device. In that case you need a:
- (C2) Industrial quick-disconnect hose coupling, to connect to your universal quick connect on the air compressors (sample).
- (C3) Push-to-connect fitting to connect the air tube to the air compressor (example).
These items are not included in your kits, as you need to get them according to your air compressor.
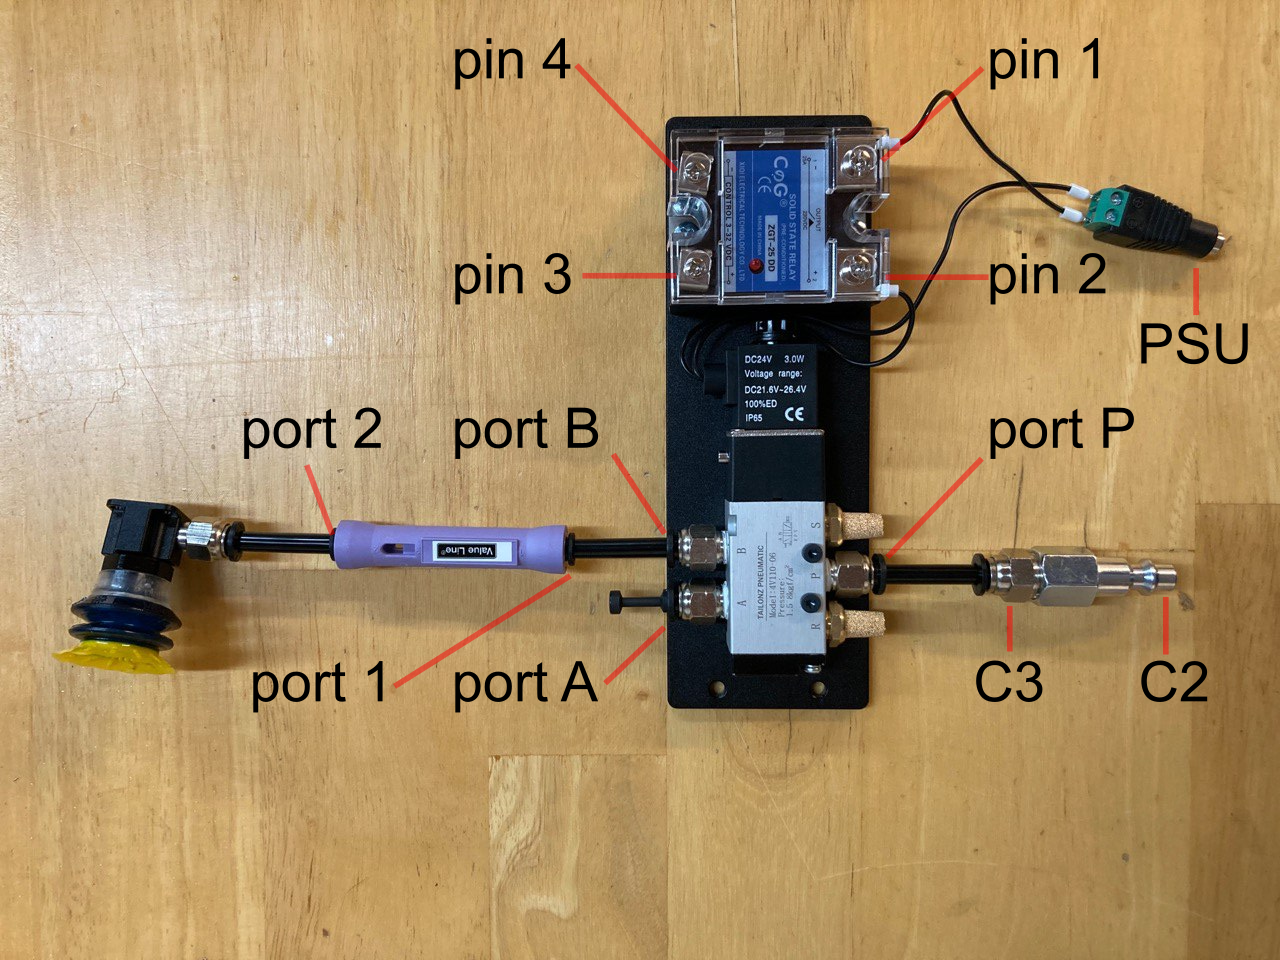
Switch and solenoid panel
This item includes a solid state relay as a switch and 5/2 solenoid valve that controls the air flow. The panel already comes assembled and you only need to connect the air tubes, power supply and IO cable.
Solenoid
The solenoid has one intake (port P, with 1/8 NPT thread) which will be connected to the air compressor, and two air outlets (port A and B, with 1/8 NPT threads). The solenoid valve acts as an air switch with two states:
- When it is off, port
Pand portAare connected. - When it is on, port
Pand portBare connected.
Relay
The relay job is to enable the control of the solenoid valve via the robot controller. The solenoid has four pins in two sides: the output side (pin 1 (negative) and pin 2 (positive)) and the control side (pin 3 (positive) and pin 4 (negative)). The control side will be connected to the robot controller in order to enable the control of the solenoid valve via robot. The output side will be connected to the solenoid and the DC power supply. The solenoid and relay require 24VDC power supply to operate.
- The GND on the power supply is connected to the negative output pin on the relay (
pin 1). - The VCC (24VDC) on the power supply is connected to the positive lead on the solenoid.
- The negative lead on the solenoid is connected to the positive output pin on the relay (
pin 2)
IO wiring
The control side of the relay is connected to the robot IO:
- Dorna 2 black version: On the control side of the relay, the positive pin (
pin 4) is connected to theVCCon the robot controller box, and the negative pin (pin 3) is connected to any of the output pin on the robot controller box. - Dorna 2 blue version: On the control side of the relay, the positive pin (
pin 4) is connected to any of the output pin on the robot controller box, and the negative pin (pin 3) is connected to the GND pin on the robot controller box.
Make sure to connect all the IO wires when the controller is turned off. Connecting the IO wire to the controller, when it is running can damage the robot controller.
Air tube connection
The firs step is to connect the port P on the solenoid to the air compressor.
Suction and soft gripper kit
These items operates by negative pressure (suction). To create a suction force we use a device call (Venturi) vacuum ejector. Vacuum ejector has 2 main ports and exhaust port. On one port you apply the air pressure (knows as port P or sometimes port 1) and on the other port (know as port V or sometimes port 2) you get the vacuum pressure.
Notice that the Venturi vacuum ejector is not bidirectional, and it is important to apply the air pressure on port
P, in order to create vacuum on portV.
It is also recommended not to keep the vacuum ejector far from the pneumatic tool (suction cup or gripper).
In this setup, we need to:
- Block port
Aon the solenoid. - Connect port
Bon the solenoid to port1of the vacuum ejector, and connect port2of the vacuum ejector to the the suction cup or soft gripper.
In this setup when you enable the output connected to the relay, you get suction force on your suction cup.
Pneumatic gripper kit
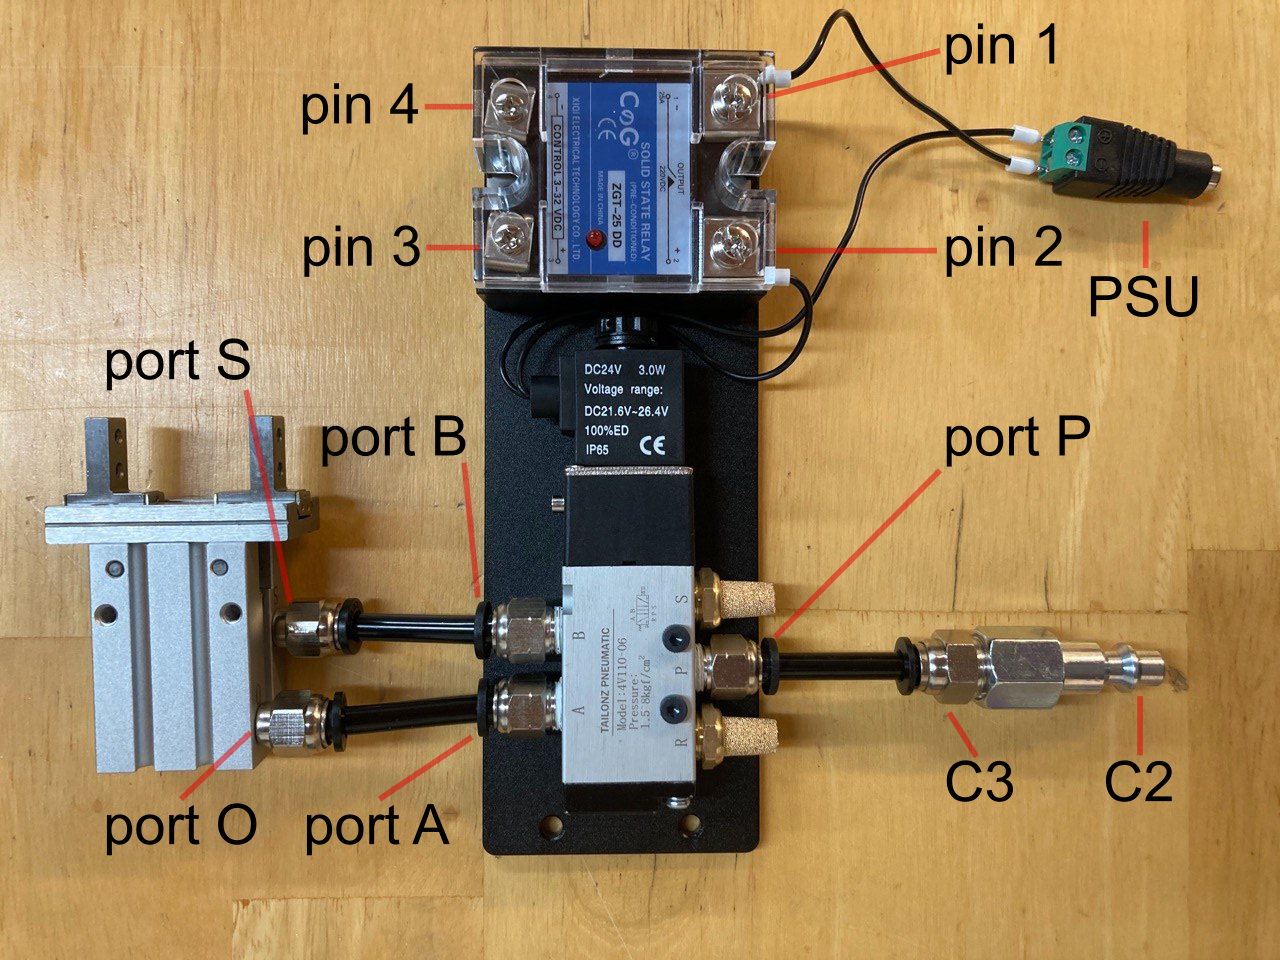
Unlike the previous case, this types of pneumatic tools work with air pressure and not vacuum. They usually have two air ports, for their two states of close and open. When applying the air pressure on one port the gripper goes to the all open state, and when applying the air pressure to the other port, it goes to the all close state.
In this setup, we need to:
- Connect the port
Aon the solenoid to the portSon the gripper. - Connect the port
Bon the solenoid to the portOon the gripper.
In this setup when you enable or disable the output connected to the relay, the gripper closes and opens, respectively. By changing switching the connection on the pneumatic gripper, we will get close state when the output is disabled, and open state when the output in enabled.