Upgrade process
Before running the upgrade process, make sure that:
- The robot controller has access to the internet.
- All your sessions and files on the controller are saved, since you need to turn off the controller at some point.
- The robot is in a safe and stable physical position and no motion is running, since the motors loose power during the upgrade.
Upgrade the OS
We first check the OS of the robot controller and make sure that it is up to date before running the rest of the updates.
This section usually applies to the Dorna 2 users with the blue body paint, and you have to complete it only once.
OS version
SSH to the robot controller and run sudo lsb_release -a to find the OS version:
dorna@dorna:~ $ sudo lsb_release -a
No LSB modules are available.
Distributor ID: Raspbian
Description:    Raspbian GNU/Linux 10 (buster)
Release:        10
Codename:       buster
If the Release item is 10 or less, then follow this section. Otherwise jump to Step 1.
We cover two ways to upgrade your OS.
- Fresh OS on the SD card: Take out the SD card from the controller box and install a new OS on it. For some users this might be difficult as, they need to open the controller box.
- Upgrade the current OS (recommended): In this method we upgrade the current OS on the controller. This method usually takes more time, but it does not require opening the controller box and taking out the SD card.
Fresh OS
 Follow the steps below to access the controller SD card, and install a fresh OS on it:
- Disconnect the power cable from the controller box.
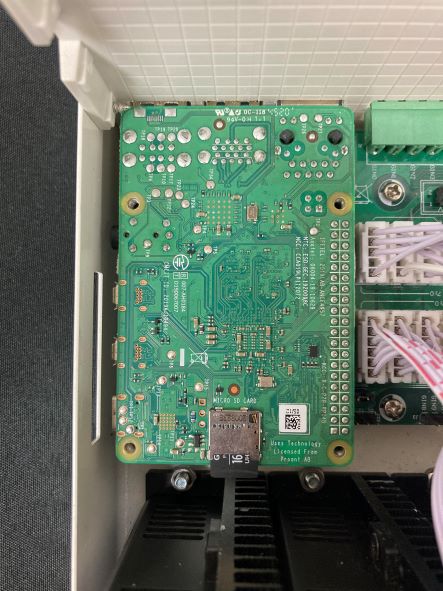
- Unscrew the 8 screws of the top lid of the controller box (located on its both sides) and remove the top lid. You should now see the Raspberry Pi and the SD card.
- Unscrew the 4 screws that connect the Raspberry Pi to the controller, gently take the Raspberry Pi out. Notice that the Raspberry Pi pins are connect to the main board.
- Now you have access to the SD card and take it out.
- Connect the SD card to your own computer, navigate to the Raspberry Pi software page and download the Raspberry Pi Imager.
- After the downloading and installing the imager. Open the software, on the CHOOSE OS option select the Raspberry Pi OS (32-bit) (first option). On the CHOOSE STORAGE option select the controller SD card connected to your computer. Before clicking on the WRITE, hold
CTRL + SHIFT + Xto open the Advanced Options page. - In the Advanced Options page
- Check the
Set hostnameoption and putdornaas the hostname. - Check
Enable SSHoption and selectUse password authentication. - Check the
Set username and passwordoption and putdornaas both username and password. - You can leave the rest unchanged, and click on SAVE button.
- Check the
- Click on
WRITEnow. This usually takes few minutes. - Once the writing process is over, put back the SD card to the Raspberry Pi. Install the Raspberry Pi to the board and make sure that its pins seat perfectly on the controller board. Tighten the Raspberry Pi and top lid screws. Now Jump to Step 1.
Upgrade the current OS
In this section we will update the version of the OS from 10 (buster) to 11 (bullseye). This process can take up to 1 hour.
Expand the file system
SSH to the robot controller and run df -h / to check the disk space:
dorna@dorna:~ $ df -h /
Filesystem      Size  Used Avail Use% Mounted on
/dev/root       3.8G  3.0G  636M  83% /
If the Size item is below 4G then follow this part, otherwise jump to the installation section.
Expand the file system by going over the following steps
- Run
sudo raspi-config - Go to
Advanced Options - Select
Expand Filesystem - Select
OK - Select
Finish - Select
Yesto reboot (or runsudo rebootmanually)
Step by step installation of bullseye
- SSH to the robot controller and update the repository lists:
$ sudo apt update
- Install all of the latest packages (and their dependencies):
$ sudo apt full-upgrade
- Reboot your robot controller to activate any packages that require a reboot:
$ sudo reboot
- Update to the latest version of the OS firmware:
$ sudo rpi-update
Another reboot may be necessary after updating your OS firmware.
$ sudo reboot
- Next, edit your
sources.listfile to switch your repository list fromBustertoBullseye:
$ sudo nano /etc/apt/sources.list
Locate the following line and change buster to bullseye:
deb http://raspbian.raspberrypi.org/raspbian/ buster main contrib non-free rpi
Save your changes (Ctrl+X) and proceed to the next step.
- Update your repository lists again (this time it will be using the Bullseye-specific repositories):
$ sudo apt update
- Install the latest version of
Node.js(this helps avoid an error you may receive when runningapt full-upgradein step 9). This step may take several minutes.
$ sudo apt install nodejs
Note that you may receive a prompt to “Restart services during package upgrades without asking”. If so, choose “Yes”.
- Update to the latest version of GCC 8 (this also helps avoid an error in the next step).
$ sudo apt install gcc-8-base
- Run another full upgrade to install any additional Bullseye requirements and downstream dependencies:
$ sudo apt full-upgrade
- Clean up your packages to remove any that are obsolete or no longer used:
$ sudo apt autoclean
$ sudo apt autoremove
- Next, you need to alter your
/boot/config.txtfile to enable KMS (the new standard video driver).
$ sudo sed -i 's/dtoverlay=vc4-fkms-v3d/#dtoverlay=vc4-fkms-v3d/g' /boot/config.txt
$ sudo sed -i 's/\[all\]/\[all\]\ndtoverlay=vc4-kms-v3d/' /boot/config.txt
- When you're all done, reboot your robot controller:
$ sudo reboot
- After a reboot, check to see if everything was updated properly:
$ cat /etc/os-release
This should return the following:
PRETTY_NAME="Raspbian GNU/Linux 11 (bullseye)"
NAME="Raspbian GNU/Linux"
VERSION_ID="11"
VERSION="11 (bullseye)"
VERSION_CODENAME=bullseye
ID=raspbian
ID_LIKE=debian
HOME_URL="http://www.raspbian.org/"
SUPPORT_URL="http://www.raspbian.org/RaspbianForums"
BUG_REPORT_URL="http://www.raspbian.org/RaspbianBugs"
Step 1
You do not have to run Step 1 all the time. Go through this step if this is your first time upgrading the firmware. Otherwise, skip to the Step 2
Modify the config file
SSH to the robot controller, run sudo nano /boot/config.txt and add the following codes to the end of file
dtoverlay=pi3-miniuart-bt
enable_uart=1
Modify the serial port
Run sudo raspi-config and then select the following options:
- select "Interfacing Options"
- select "Serial Port"
- select "No"
- Select "Yes"
- Select "OK"
- Finish and reboot
Step 2
SSH to the robot controller and run the following line (copy/paste everything) in the terminal:
sudo rm -rf /home/dorna/Downloads/upgrade && sudo mkdir /home/dorna/Downloads/upgrade && sudo git clone https://github.com/dorna-robotics/upgrade.git /home/dorna/Downloads/upgrade && cd /home/dorna/Downloads/upgrade && sudo sh setup.sh dorna_2
Depending on your internet speed, the process can takes few minutes.
Step 3
Once the upgrade process is completed you should see the following messages on your terminal window.
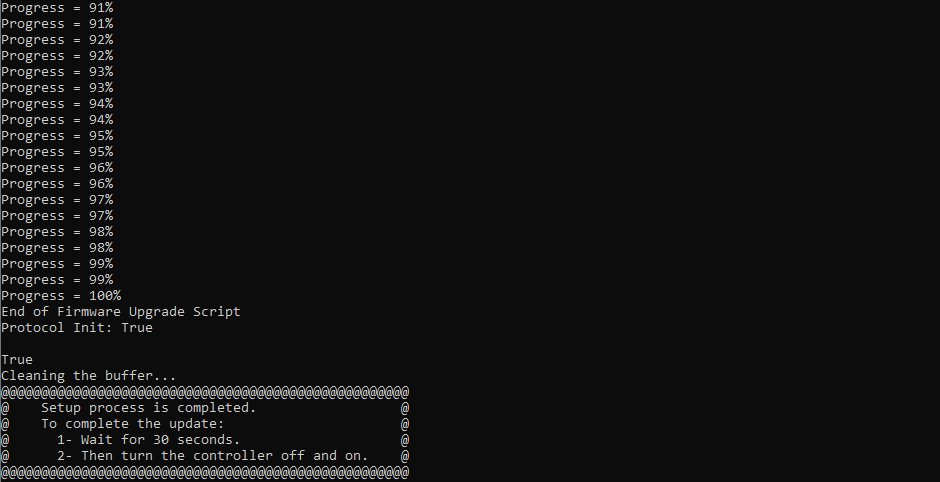
Notice that the progress percentage reaches to the 100%. Wait for around 30 seconds, then turn the controller off and on to complete the upgrade process.
After upgrade
Once the upgrade process is completed, you can now access the updated Dorna Lab via http://robot_ip_address in your browser. For example if your robot IP address is 192.168.254.134. Then just type in http://192.168.254.134 in your browser.
Most of the time, you need to (hard) refresh your Dorna Lab browser page, to see the changes. In this case press Ctrl + F5 or press Ctrl and click on the refresh button on the browser.
Check for new updates
To check for the new updates, make sure that the robot controller, has access to the internet, then:
- Open Dorna Lab via browser.
- Go to the Setting > Info > Device.
- Under the Device section click on Check for Updates and wait for the controller to check the latest updates by connecting to the Dorna Server.
- If new updates are available then follow upgrade process and run the update.